Back to blog
How to install and enable an SSL certificate on a WordPress website?
With the cybercrime threat constantly on the rise, elevating the security level on the website has become a focal point for every responsible business owner. And the best way to reassure your clients that their details are safe with you is to obtain an SSL certification.
The installation process for an SSL certificate on a WordPress site sounds more complicated than it actually is. There are only a few simple steps to follow, and we will cover them all in this article. Read on to find out how to install and enable an SSL certificate on a WordPress website.
SSL certificate on a WordPress site – how does it work?
SSL, which stands for Secure Sockets Layer, is a security protocol used for creating an encrypted link between a browser and a server where the website is hosted. This technology guarantees that the connection cannot be breached by hackers and that the exchanged data remains safe and confidential. Encryption protects the users from getting their sensitive data stolen, namely credit card numbers, logins and passwords, and personal information typed into website forms.
To check if the website you’re on has a valid SSL certificate, just look at your browser’s address bar. The closed padlock and the URL starting with HTTPS are the signs of a certified webpage.

Secure Sockets Layer ensures the data sent from the browser gets scrambled and can be decoded only with a decryption key on a hosting server. With SSL your website’s identity is authenticated so the visitors can be sure it’s legitimate.
What are the types of SSL certificates?
There are three main categories of SSL authentication subject to the level of validation:
- Extended Validation (EV)
- Organization Validation (OV)
- Domain Validation (DV)
It is important to note that every type of SSL certificate guarantees the same level of encryption and security. The difference is in the way the website owners are verified by the Certificate Authority (CA).
With Extended Validation, the applicants need to supply detailed records confirming they’re the actual owners of the specific domain, the validation process also includes thorough verification of the legal, operational, and physical existence of the company. It may take up to five days for the DV certificate to be issued.
With the Domain Validation type, only a single proof of ownership is required, these encryption-only certificates are usually generated within minutes.
The Organization Validation type is more thorough than DV and can be obtained only by registered organizations.
Choosing the right type of SSL certificate is important, especially for public-facing websites. The Domain Validation type may be good for internal sites or test domains, but it doesn’t guarantee the website owner is a legitimate entity. Extended Validation certificates, on the other hand, are the most expensive and difficult to obtain but provide the highest level of trust.
You can verify the type of SSL certificate of any website by clicking the padlock icon and checking the secure connection details.
How do I install SSL on my WordPress site?
1. Buy the certificate or get it for free
There are over a hundred CA organizations issuing digital certificates for websites around the world. You can purchase a certificate from the companies like DigiCert or RapidSSL; you can also get a free SSL from a nonprofit Certificate Authority Let’s Encrypt.
While you may want to get the certificate directly from the issuer or the third-party seller, the most convenient way is to do it via your hosting provider. Many hosting companies offer SSL certificates for their users, and the cost is often bundled into the hosting fee. In this case, the SSL certificate on a WordPress site can be enabled with only a few clicks in your WP panel. Check with your hosting provider for available options. Bear in mind that you will also need to contact your hosting company in order to install any other SSL certificate on the server.
2. Generate the CSR
Assuming you want to install an SSL certificate on a WordPress site all by yourself, you need to generate the CSR key first. CSR stands for Certificate Signing Request, and it is an encrypted text holding your organization’s details, combined with private and public encryption keys. The process for generating CSR may differ depending on the type of management platform your server is using. We will cover the procedure for the most popular one, cPanel:
- Under the Security menu go to SSL/TLS. Find the Certificate Signing Requests (CSR) section and click Generate, view, or delete SSL certificate signing requests.
- Fill in the Domains, State, Country, Company, E-mail, and all other fields with alphanumeric characters.
- Click Generate.
This process will create your private and public encryption keys. The CSR code with all information will be then sent to the Certificate Authority. This will start the validation procedure. Depending on the type of certificate you’re after, the CA will send you relevant instructions for proving your domain ownership. Once the vetting process is complete, you will receive the confirmation along with the files needed for certificate installation.

3. Install the SSL certificate on the hosting server
After a few minutes (or a few days) of waiting for your shiny new SSL certificate, you can finally upload it to the server:
- Go back to the SSL/TLS within the Security section. This time head to Certificates (CRT) and click Generate, view, upload, or delete SSL certificates.
- Go to Upload a New Certificate and locate Paste the certificate into the following text box. Paste the code from yourdomain.crt file you have received from the issuer of your SSL certificate. Make sure to include the —BEGIN CERTIFICATE— and —END CERTIFICATE— lines.
- Click on Upload or Save Certificate to proceed further. Alternatively, you can upload the whole .crt file by clicking Choose File and then Upload Certificate.
Once the certificate is uploaded, you need to install it:
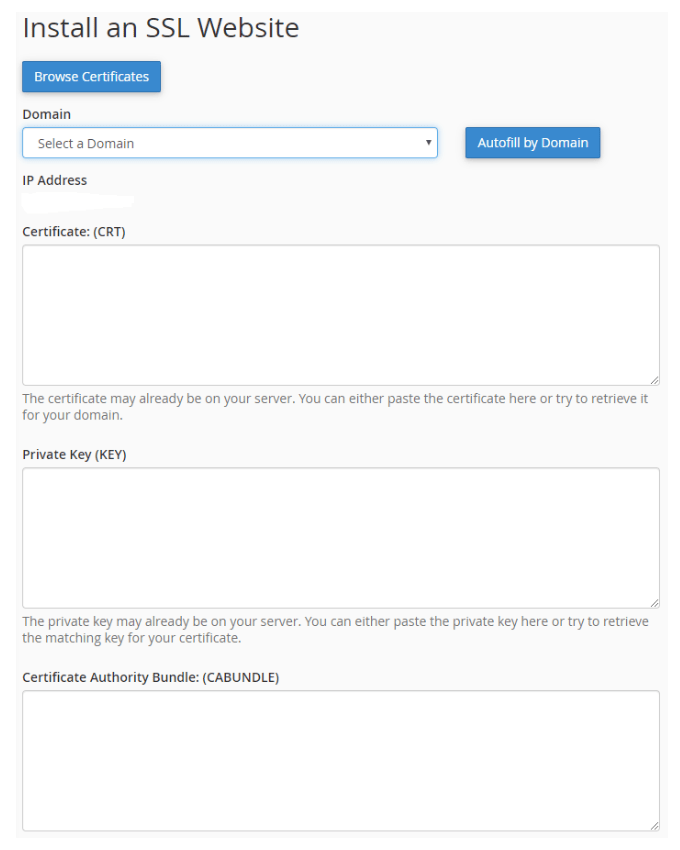
- In the SSL/TLS menu go for Install and Manage SSL for your site (HTTPS) and pick Manage SSL Sites.
- From the drop-down menu pick the domain the certificate has been issued for. The Certificate (CRT) and Private Key (KEY) fields will get automatically filled by the system.
- Paste the contents of the CA Bundle file (emailed to you by the certificate issuer) into the Certificate Authority Bundle (CABUNDLE) box.
- Click the Install Certificate. That’s it – the SSL certificate is now installed on your server.
4. Enable an SSL certificate in WordPress
Now that you have looked after the server side of the process, it’s time to install and enable an SSL certificate on a WordPress site. This can be done manually, but we strongly advise against it. You can sort it out with a single click by using the plugin – we recommend either the Really Simple SSL or WP Force SSL. These plugins automatically configure your website and redirect the traffic to run over HTTPS. Just click the Activate SSL button and hope there will be no…
5. …Mixed Content Warning. How to fix it?
Mixed Content Warning is the most common issue affecting the SSL migration process. It means that some elements do not load over HTTPS. This may happen when, for example, absolute referencing has been set for some images or scripts and your now-secure website tries to load content via HTTP URLs.
To fix the Mixed Content issue, you can either manually correct all the HTTP links or use the Better Search Replace plugin:
- Go to Tools > Better Search Replace and choose the Search/Replace tab
- In the Search for box write your domain name with HTTP
- In the Replace with box write your domain name with HTTPS
- Click Run Search/Replace. That should do the trick
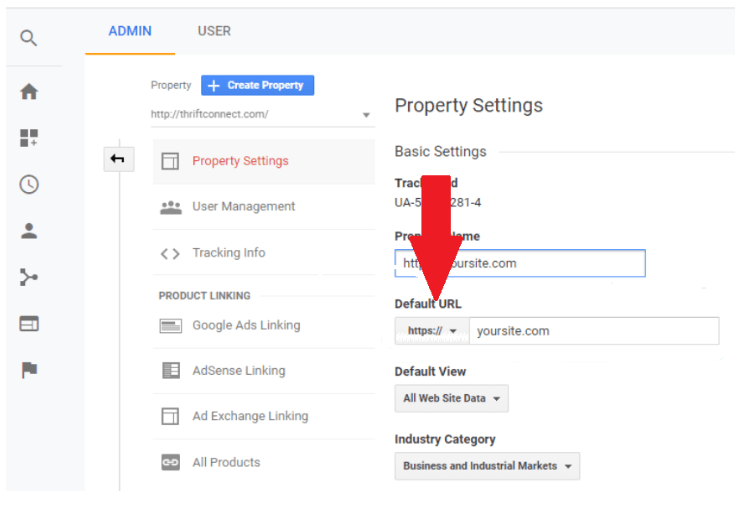
6. Update Google Analytics
Hooray! We’re almost done. The one last step is needed to let the search engines know your website now works over HTTPS. To do that, you just need to:
- Go to the Admin section in Google Analytics
- Find Property > Property Settings
- Change to HTTPS In the Default URL box and save it
Our parting shot
Enabling an SSL certificate on a WordPress website is always a smart idea. Not only does it reassure the potential clients you care about their safety online, but it also helps your website rank better in SERP in the long run. Granted, the moment you switch to HTTPS you may see a temporary drop in the site’s search engine ranking, but it will catch up in no time. Google’s algorithm positively recognizes the presence of HTTPS, while insecure HTTP sites are marked with a warning in all major browsers. The choice is simple.


What can we do for you?
Talk to us about your project and let's start building it together!