Back to blog
How to create a Gutenberg block with Advanced Custom Fields?

How to Create a Gutenberg Block with Advanced Custom Fields?
For many business owners, WordPress is a lifesaver. This is the content management system that makes high-level web development projects possible, even for teams with shoestring budgets and limited resources, after all, and it has revolutionised approaches to eCommerce and digital marketing.
However, many users are still only scratching the surface when it comes to WordPress. With plugins like Gutenberg and Advanced Custom Fields, you can be unlocking a world of potential for your business moving forward. Let’s take a look at how this is done.
Table of Contents
- What Is WordPress Gutenberg?
- What Is a Gutenberg Block?
- What Are WordPress Gutenberg Custom Fields?
- Gutenberg vs Elementor: Which One Is Better?
- Gutenberg vs Elementor: The Similarities
- Gutenberg vs Elementor: The Differences
- Gutenberg vs Elementor: The Winner
- Advanced Custom Fields — What Is It?
- How to Use ACF in the Right Way
- Installing the ACF Plugin
- Creating Your Fields
- Populating Your Content
- Examining ACFs with Code
- What Are ACF Blocks?
- Why Create Gutenberg Blocks with ACF?
- How to Create a Gutenberg Block with Advanced Custom Fields?
- ACF Makes It Possible to Create Blocks
- Step 1: Registering the New Block
- Step 2: Creating Field Groups
- Step 3: Complete Block Rendering
- Advanced Custom Fields and WordPress Gutenberg: The Benefits to Your Business
- Benefit from Expert WordPress Development Services: Reach Out
What Is WordPress Gutenberg?
Since the release of WordPress 5.0, Gutenberg has been an integral part of WP. It’s designed to enhance and extend the experience WordPress users have when they work with the content management system. Specifically, Gutenberg is an editing tool, and it replaces the more familiar WordPress Classic Editor from previous versions.
But what is the reasoning behind Gutenberg? Why change something that was already working just fine? WordPress’s founder Matt Mullenweg was quick to defend his company’s decision to launch Gutenberg, and to revolutionise the editing process for users of WordPress.
“The Gutenberg editor will endeavour to create a new page and post building experience that makes writing rich posts effortless,” he said. He went on to explain how WordPress Gutenberg is more intuitive and easy to use, supporting a far more effective and efficient building experience. Basically, users are able to craft highly functional and visually arresting sites without having to get to grips with difficult code.
In some cases, it is still possible to use the Classic Editor. For those who are not yet fully sold on Gutenberg, a plugin will enable you to connect with the old-style Classic Editor functionality. However, this should be avoided — Gutenberg is not simply a “dumbed-down” or bare-bones version of the Classic Editor; it is a more streamlined and straightforward way to achieve the same great results from website building.
What Is a Gutenberg Block?
How does the Gutenberg editor achieve this improved functionality and user interface? Primarily, this is achieved through the deployment of Gutenberg blocks. But what exactly is a Gutenberg Block?
A block is a discrete section of your content. For example, your page will be built from different elements — perhaps a section of banner text, an introductory video, a few images and then the body paragraphs of your page. All of these different elements will be represented by different blocks within the Gutenberg block editor. You can use a template or pre-made element, and drag this into place as you build your page. Alternatively, you can build elements from scratch and slot these into place.
The idea is to make life much easier for page designers. Rather than having to design a page in full, they can work with a library of different elements. Then, when it is necessary to build an element from scratch, this development job is isolated from the rest of the page.
We can see the inspiration for these blocks in the name of the plugin itself — Gutenberg. Johannes Gutenberg was the 15th-century German inventor and publisher who became famous for the invention of movable type. What was once a laborious and difficult process of manually crafting print frames, or even copying out huge sections of text by hand, was revolutionised by Gutenberg. He devised a system in which word, letter or text blocks could carry out printing jobs without delay or difficulty. The medium may have changed, but the concept remains largely the same in WordPress Gutenberg.
What Are WordPress Gutenberg Custom Fields?
When building pages or WordPress themes with Gutenberg, you are going to encounter custom fields. So what are these WordPress Gutenberg custom fields?
Custom fields provide an easy method of enhancing the functionality of your page. When using these fields, you simply store a name and value pair, ready to be run when the page loads. To understand this better, let’s look at a basic example — displaying an image when a URL is shared on social media.
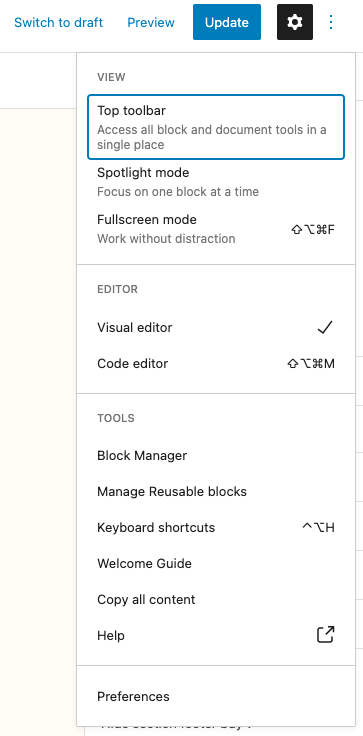
How to achieve it? To enable Custom Fields, click the three dots in the upper right corner in your WordPress editor and select “Preferences”:
Then select “Panels” and enable Custom Fields:
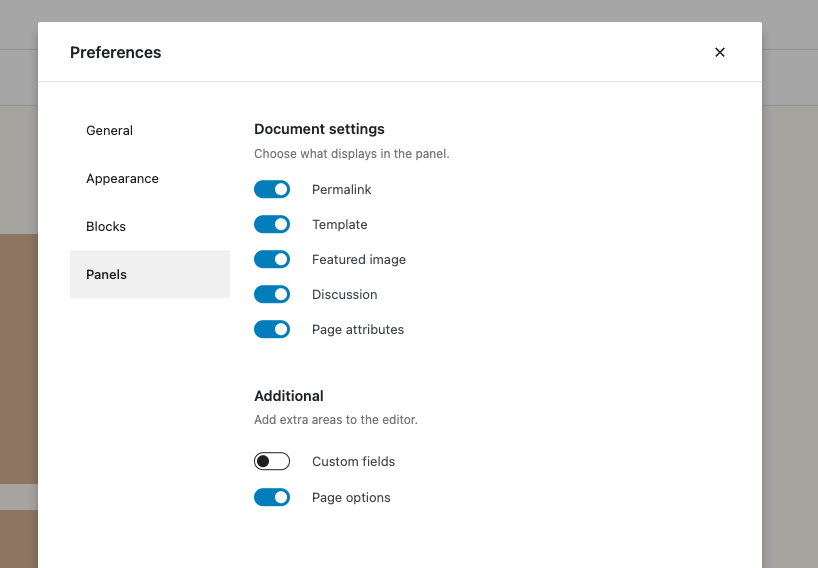
Now on the website we have the ability to add our own Custom Fields and with basic developer knowledge, we are able to display them anywhere in our template.
Custom fields are certainly very useful to business owners and page developers, but you can go a step further than this. Below, we’re going to be looking at Advanced Custom Fields (ACF) in Gutenberg and examining how these features can help you get more from your Gutenberg blocks and from the WordPress platform as a whole. With ACF, you can create functions and actions more easily, and even create your own customized Gutenberg blocks.
Gutenberg vs Elementor: Which One Is better?
One of the most exciting aspects of working with WordPress is the diversity of the ecosystem. With so many different plugins and options available to business owners and website developers, you are certain to find that your needs are covered — whatever these needs may be.
However, this array of choice can also be confusing. When different plugins do similar things, how do you decide which one is the best option? This is the conundrum that meets business owners when they are forced to choose between Gutenberg and Elementor — two page building plugins for WordPress. So let’s compare the options.
Gutenberg vs Elementor: The Similarities
Let’s start with the similarities between these two plugins. Both plugins are designed to make life easier when building pages, unlocking a wealth of potential while eliminating much of the reliance on complicated coding and development practices. Gutenberg, as we have examined, uses blocks to achieve this, while Elementor uses “elements,” although the concept is largely the same.
Both of these systems function in largely the same way, utilising a drag-and-drop editor to manoeuvre content blocks/elements into position ready for publication.
Gutenberg vs Elementor: The Differences
While there are many similarities between Gutenberg and Elementor, there are also significant differences. For instance, WordPress developed Gutenberg itself, whereas Elementor is a third-party plugin. This means Gutenberg will always work beautifully with WordPress sites, even when WordPress is updated or upgraded. The same indefinite support and effectiveness can’t be guaranteed for Elementor.
Elementor generally provides a little more control to the user than Gutenberg does. Users will be able to customize and tinker with different aspects of their sites, including making changes to page responsiveness across different devices. This additional control may represent an attractive proposition for developers, but tread carefully. You may find that Elementor is more difficult — and less intuitive — to use when compared with Gutenberg, and this can slow down your page development projects. Finding a balance is crucial here, as you seek to achieve both high levels of usability and an effective and powerful website.
Gutenberg vs Elementor: The Winner
Which option is the best for you — Gutenberg or Elementor? Well, both options are very good at what they do, and both will help you to achieve a high-functioning website with plenty of features. Both will also enable you to scale your pages and grow your website over time, leveraging the granular power of blocks (or elements) to build your website.
Choosing a winner depends on how much control you want as you build your page. If you want to micromanage the entire page-building experience, making tiny alterations here and there throughout the entire process, Elementor might provide the best option. However, this comes with its own challenges. Assuming this level of control increases the potential for things to go wrong during the page-building project. It also largely defeats the object of having a modular editor plugin in the first place — the modular aspect of the editor is designed to make the entire process more intuitive and straightforward, and this benefit could be lost if you assume too much control over the building of your page.
There is also the fact that Gutenberg is designed — and, therefore, fully supported — by WordPress. If you are working with the WordPress content management system, it makes sense that you use plugins and tools that are not only supported by WordPress right now but are also guaranteed to remain so in the future. With this in mind, we recommend WordPress Gutenberg as a website editor.
Advanced Custom Fields — What Is It?
We’ve already touched on custom fields earlier in this article, and we’ve examined how these fields can be used to quickly and easily develop the functionality of a web page. Advanced Custom Fields (ACFs) build upon this potential, putting more developmental capability into the hands of business owners and site designers.
While custom fields have been a part of the WordPress structure for a long time and are built into the native toolset of the solution, Advanced Custom Fields are a little different. ACFs are accessed via a plugin that will need to be installed — it will not be automatically accessible from your WordPress interface by default.
The primary aim of Advanced Custom Fields is to make using custom fields easier for developers. Traditionally, the custom field interface is not very user-friendly, and it may be a little cumbersome and difficult to deploy. This makes operations difficult, particularly for businesses with multiple developers who need to be onboarded to the WordPress solution. Not only is it easy for you and your teams to create functions and content features, and then deploy these within your page, but you will also find that ACF actively expands your capabilities, helping you to build highly effective websites more quickly and ensuring that your audience enjoys rich functionality.

How to Use ACF in the Right Way
Now that you know a bit more about ACF Blocks for Gutenberg, including what it is and how it works, it’s time to get to grips with how to use this feature in the right way.
ACF is fairly simple to set up and use. To begin with, you will need to install the ACF plugin.
Installing the ACF Plugin
You’ll find the ACF plugin in the same place you’ll find all of your other WordPress plugins. When you log into the WordPress user interface, head to the Administration Panel and find the Plugin menu. Clicking or tapping on this button will display a list of options, including Add New. Hit Add New and then search for Advanced Custom Fields. Once you’ve found the right plugin, select Install Now.
If you have downloaded the plugin from the developer site, or from a third-party market, you will need to install it differently. You will need to begin by uploading the plugin to the /wp-content/plugins/ directory. Next, go to the Administration Panel and return to the Plugin menu. Here you will be able to see the plugins you have uploaded, including the ACF plugin. Activate this plugin to get started.
Whichever way you choose to download and install ACF, the result will be the same. You’ll find a new menu item within your WordPress interface, marked Custom Fields.
Creating Your Fields
Once you have installed and activated ACF, it’s time to start using the plugin. As noted above, ACF is designed to be more user-friendly and intuitive than the native WordPress custom fields option, so this step should be fairly straightforward.
When you make your field, you will encounter the New Field window. Here, you will provide a Field Label, which will appear on the Edit page, followed by a Field Name and a selection from the Field Type menu — a Range, Basic Text, a Text Area, or a Button Group, for example. These values are all required whenever you create a field.
You can also add other information, such as instructions for page authors, placeholder text to appear within the page block, prepend and append values to bookend the page block, as well as other fields if you wish. With ACF, you can complete field creation, editing and upload tasks swiftly and easily, although your control over the customisation of these fields is limited.
If you are comfortable with modifying the functions.php file, you can achieve further customisation, making alterations that are not available through the user interface alone. This requires a higher level of technical skill and understanding, but it enables users to achieve more control and leverage when using Gutenberg. We have already touched on the lack of control Gutenberg offers compared to a solution like Elementor — the ACF plugin is a way to redress this balance.
Populating Your Content
Once the fields are created, you can simply begin adding your content to the content creation form. WordPress ACFs make it easy to visualise how your page will look upon completion, as well as exploring the user experience you are offering to your audience whenever they visit your website.
This is because the functions will appear in your content as you create it. You do not need to trigger any specific events or carry out any other actions, as they will just appear automatically. This means you can keep track of how your page is developing, and of the changes you are making, without relying upon fiddly commands.
You’ll be able to visualise the results of a wide variety of functions and actions — such as the get_sub_field() function, or the acf/field_group/admin_footer action — without interrupting the flow of your content creation. This makes increased productivity and a more task-focused working practice two other benefits of the ACF plugin for WordPress.
Examining ACFs with Code
The ACF plugin is intended to be both very easy to use and highly capable for those with the requisite background in coding and dev operations. This is reflected in the way that ACFs are displayed to users.
As we’ve discussed above, the easiest way to create and view an ACF is to do so in the user interface. Via this UI, users can examine the custom fields and their results on a “what you see is what you get” (WYSIWYG) basis, as the plugin returns a visual representation of the ACFs.
To go beyond this, and to get to grips with the created code, users deploy the get_field( ) or the_field( ) functions. These functions are used to display field values as either a PHP variable or an HTML output. For example, if you have set a hero image to appear whenever a specific subheading is inputted, you can check this using the <?php if(get_field(sub_heading)) : ?> function. You can also make changes and editions in this functions.php file.
What Are ACF Blocks?
The Advanced Custom Fields Pro version (ACF Pro) helps you to do even more with your custom fields. Not only can you create ACFs in an intuitive and straightforward manner, but you can also utilise pre-created ACF Gutenberg blocks, which you can simply drag and drop into place as and when you need to.
But what are these ACF Gutenberg blocks? Basically, ACF Gutenberg blocks work across a secure API to provide page elements and pieces of functionality that can be used to build a website. This brings together the granular and modular aspects of the Gutenberg page editor with the intuitive functionality of ACF to give users the best of both worlds.
You can tap into the capability of these ACF blocks immediately, with no need to set up or create blocks of your own. You just need the ACF Blocks Suite, a collection of ACF blocks that are all ready to deploy within your WordPress site. Examples include the Scrollable Image Block — displaying images that your page visitors can scroll across — and the Social Sharing Block, displaying social media sharing buttons. These are just a couple of the options available to you as you build your page.
Why Create Gutenberg Blocks with ACF?
The ACF Blocks Suite provides you with a wealth of different pre-made page blocks that you can use to achieve high-level functionality with relative ease. So, why would you need to create your own block when you have a library of blocks ready and waiting for deployment?
There are multiple answers to this question.
Chiefly, your business is unique, so you may need similarly unique features and functions built into your website. What works for one business might not necessarily work for yours, so a pre-made template might not always be up to scratch.
Secondly, content management platforms like WordPress — and WordPress’s plugins such as Gutenberg and ACF — are designed to evolve and develop over time. This means working with a growing library of functions and features. By developing and registering block templates, you are helping to contribute to this expanding resource.
How to Create a Gutenberg Block with Advanced Custom Fields?
If you have the resources, it makes sense that you would want to create an ACF Gutenberg block rather than rely on pre-made blocks for all of your page features. But how do you do this?
ACF Makes It Possible to Create Blocks
It’s worth noting that the traditional process of creating an ACF block is difficult. It is highly technical, time-consuming and resource-intensive. This is why businesses tended to use pre-built blocks unless they had the development know-how required to code a block from scratch.
Fortunately, ACF opted to improve the experience for web designers and developers. With ACF Blocks, developers can create custom blocks without running headlong into confusing arrays of JavaScript, or hitting any other coding-related obstacles.
There are many overlaps with the How to Use ACF in the Right Way section we’ve already discussed above. This is because you are basically doing the same thing, creating a page element or feature that you can use again and again in your development project. Gutenberg is a permanent part of WordPress editor, but you should install the ACF. You’ll need to know how to use the basic functionality of ACF we’ve discussed in the above section.
Step 1: Registering the New Block
The first phase of this process is the registration of a new block. When you register a block, you are effectively anchoring this block within your .php code — creating a callback that you can insert as and when required.
The acf_register_block_type( ) function will enable you to complete this phase. You’ll also be able to add customised features, such as the block name, its title, description and category, among other key pieces of information.
Step 2: Creating Field Groups
You’ve already had a chance to explore ACF fields when we looked at how to use ACF. Now, you’ll be able to use these fields to create your Gutenberg block. Basically, you need to select which fields are relevant to your block and to its functionality. There is no limit to the number of fields you do or do not include as you build your block — it all depends on what you want the block to do.
Simply select the fields you want to include, and then move down to Location in the Edit Field Group window. Here, you’ll be able to select the block name you have just registered and add your chosen fields to this block.
Step 3: Complete Block Rendering
The bulk of the set-up process is now complete, and your newly registered and created block is basically ready to go. You just need to let ACF know how to display this block.
In the function.php view, use acf_register_block_type() function argument – “render_callback” setting to render the HTML of your block and to add any custom code you require. This is where an element of coding knowledge and understanding is important, but you will still find that the process is far simpler and more straightforward than building a new block manually in the previously used way.
Advanced Custom Fields and WordPress Gutenberg: The Benefits to Your Business
Using ACF and WordPress Gutenberg connects your business with a wealth of different benefits, including the following:
- Gutenberg makes the creation of powerful and highly effective pages simple and straightforward in the WordPress interface.
- The drag-and-drop nature of Gutenberg blocks allows for easy scaling and evolution of your website over time.
- ACF makes WordPress’s custom fields function far more user-friendly while also offering developers and designers far more control over the project.
- With ACF, you can add pre-made blocks to your website, making the building experience even easier.
- ACF also supports the building of customised blocks, ready for deployment with WordPress Gutenberg.
Benefit from Expert WordPress Development Services: Reach Out
Here at Develtio, we provide expert web and WordPress development services to our clients. Reach out to speak with our team, schedule a consultation and find out what we can achieve for you.


What can we do for you?
Talk to us about your project and let's start building it together!