Back to blog
How to migrate to WordPress from any CMS?
There are plenty of platforms, content management systems, and website builders that millions of people are happy to use. At a certain point, though, you may feel that you face some limitations when using a particular solution. When your business grows, and your goals change, it’s time to consider moving a website to a more flexible platform.
You may feel that the Drupal, Joomla, or Wix platforms have served you relatively well so far. Top that with the vision of moving all your content, users, and media to another CMS, and the thought of migrating to the new website might suddenly seem too daunting. Don’t fret, though. Even if you can’t afford a professional to help you with this task, we will guide you through the process of moving your site to WordPress. Why this particular CMS, you ask? Read on to find out.
Why WordPress?
WordPress gained popularity as a blogging platform, but it evolved into something far more sophisticated. It’s a market-leading CMS, scalable, customizable, and yet highly beginner-friendly. As a multi-purpose solution, WP can do what other mentioned platforms can, but it’s easier to install and operate. Moreover, if you choose to migrate, you can benefit from a comprehensive list of extensions, plugins, and themes, not to mention the ongoing support of a community of users and developers. Additionally, with dedicated plugins and SEO-friendly permalink structure, WP makes search engine optimization super easy.
Before you decide to move, remember that there are two kinds of WP – WordPress.com (a hosted solution) and WordPress.org, a self-hosted option that we will focus on. You don’t need to worry about a host or system-specific terms of reference and functionality limitations when using a self-hosted platform. Moreover, with this option, you become the owner of the gathered data.
Planning and preparation
The migration process is similar, no matter which CMS or website builder you use. It would be the easiest to simply say – use a plugin (because you can), but let’s take a more holistic approach and begin with the preparatory phase.
Evaluate the current website
Start with the end goal in mind. Think about what you want your website to look like. Then, do the inventory of the current site’s content and features. Take note of menu structure, forms, content types, layout, links, images, videos, icons, social media sharing, e-commerce elements, SEO, backups, and security. Consider whether you want to move comments sections, membership pages, and contact and email forms if you have them.
Now, onto the design – will you go wild and choose a completely new layout, or do you want to keep the same or similar look? Establishing this will help you later select the suitable theme, plugins, widgets, menu structure, etc.
Plan the new structure and reorganize content
WordPress uses posts and pages to store content and organizes it with categories and tags. But it’s you that needs to decide the structure. There is a difference between the two types of content – for example, as a restaurant owner, you may want to create a separate menu page or decide to publish announcements about the changes in the course list (these would then classify as posts).
Plan for an SEO migration
We won’t lie – it’s easy to mess up the migration process, and a poor SEO strategy is one of the most common reasons. But if you plan well, you can minimize the possibility of losing traffic. First, act fast – migrations should be done swiftly and smoothly to ensure SEO rankings are not lost. Then, map out all the SEO elements to be moved – page titles, H1s, links, meta descriptions, etc., and all those that will change. Making such a list will also be helpful if not everything will be migrated automatically, and you need to insert the information yourself.
Prepare a redirection strategy
Already at this point, you can note down a relevant plugin on the list of add-ons that you will need at the later stage. For example, products such as the Redirection plugin ensure that the existing custom URLs are functional post-migration and that all your 301 redirects and 404 errors are tracked and taken care of.
Back up
We’ll talk about securing your new site later, but for now, ensure that you have made a backup of all your existing web pages. Plugins are great and usually work well, but mishaps can always happen, so follow the “better safe than sorry” rule.
Setting up the WordPress site
Before moving the content, you must set up a website’s structure. Here are the steps to take.
Purchase hosting and domain name
Every site needs hosting to store your files and display them to the visitors. Hosting gives your website its own space on the Internet, its home, so to speak. Of course, you want to feel comfortable in your own house, so make sure your choice is tailored for WordPress, beginner-friendly, fast, secure, and reliable. If you’re on a strict budget, you can consider shared WP hosting, but most enterprises turn to managed hosting solutions, such as Kinsta, WP Engine, or SiteGround. The managed hosting provider operates in an environment fine-tuned to WP and ensures regular updates, backups, and malware scans.
Your next step is to purchase or connect a domain, which is essentially your website’s address on the Internet. During the migration process, you can set up a temporary domain name.
Install WordPress
When considering a hosting service, look for the one that gives you the possibility of a one-click installation to save time. You will receive a notification when your account is ready to use.
Set up the design
Now it’s the time to customize the appearance of your site, which you can easily do with one of the thousands of available WordPress themes. Choose the one with a classy design, check what in-built features it comes with, whether it’s user-friendly and if you like the look of the widgets, icons, and menus. Use the theme directory and install the one you like from the WP dashboard, under Appearance > Theme > Add New.
Change permalink settings
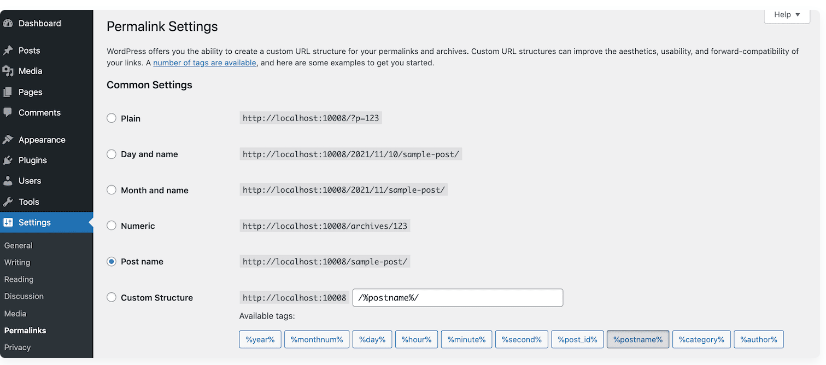
At this stage, it’s a good idea to set up the permalink structure. We’re talking about the kind of link that is used to access specific content on your side. During the migration, the content may use its URL structure used in, for example, Drupal. By default, WP uses the “plain” setting, looking like this: example.com/?p=123, which doesn’t provide visitors with much information. Instead, you can choose a post name structure based on the post title: example.com/sample-post/ or a date-based format if you own the news website. On the WordPress dashboard, go to Settings > Permalinks and decide which model fits your purpose.
that you can change
your business.

Importing content
The content migration process looks different depending on the initially used CMS and the chosen plugin. The official WP codex provides useful information on how to move your content from various other platforms. We’ll shortly describe three examples.
Joomla to WordPress
The popular plugin used in this case is FG Joomla to WordPress. First, check the current Joomla version you’re using to see if you have to utilize the free or premium version of the plugin. Then, start the installation by going to the dashboard > Plugins > Add new. Look for the plugin’s name in the search bar, click Install Now and Activate.
In your Joomla dashboard, select System > Global Configuration. Then, under the Server tab, you will find Database settings. Note down the content of these fields.
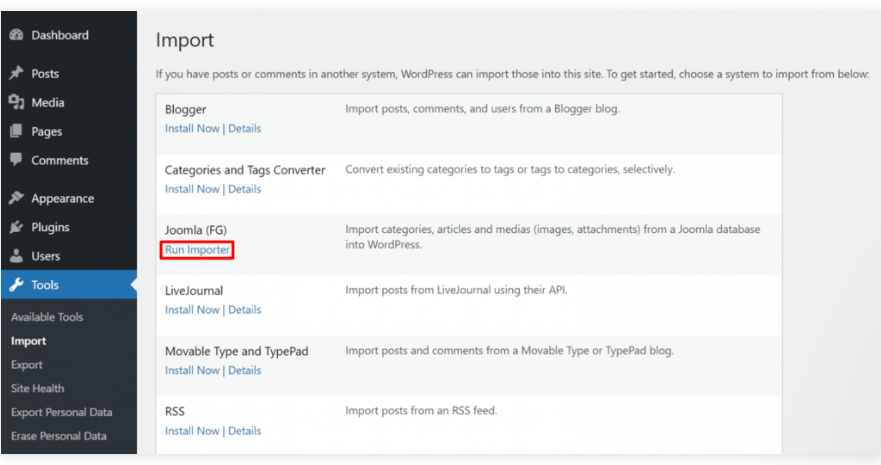
Go back to the WP dashboard, select Tools > Important > Joomla FG and click Run Importer.
Next, the system will ask about the Joomla website parameters: the URL of the existing site and the method of transferring the data (HTTP is the default option). Moving on, you will be asked to insert the database parameters noted in the previous step. In the next section, called Behavior, you need to choose the type of content and data to be imported to WP (such as posts, keywords, media, or categories). Once selected, click Save Setting and Start/Resume the import.

Drupal to WordPress

You will follow similar steps for Drupal migration, this time using the FG Drupal to WordPress plugin. To find the database parameters, use an FTP client – like FileZilla and navigate to drupal/sites/default/settings.php. Next, open the file using the text editor and locate relevant information.
Wix to WordPress
There are two ways you can import content from Wix – using an RSS feed or a plugin.
RSS feed: this option is valid for old Wix blogs. Add /feed.xml to the end of your Wix site URL to locate the RSS file. You will see a page with a code – save it. Next, go to Tools > Import in the WordPress dashboard and click the Run Importer button under RSS. Finally, upload the files saved in the previous step.
The images from the posts will not be automatically migrated, so you need to either move each of them manually, upload them in bulk via FTP/SFTP or use, for example, the Import External Images plugin for this purpose. The pages also need to be transferred, but there is no way to do it automatically, so you’re facing some serious copy-pasting time. Copy the content of each Wix page and create a new corresponding page with WordPress dashboard > Pages > Add New.
Plugin: The CMS2CMS plugin transfers the content of the Wix site, but not the design. Also, it duplicates original pages as posts, so the category needs to be adjusted manually. Nevertheless, it can significantly speed up the migration process. You simply need to create an account, install the plugin and select the assets you’d like to move. The transfer will be finalized after the payment is processed.
The final stage of the importing phase is organizing the content and adding categories, menus, and widgets.
After the import
Once the import is finished, take advantage of the WordPress potential with some must-have plugins. Here are our recommendations:
- WooCommerce for anyone interested in creating an online store or enabling payments
- Yoast SEO to optimize content and ensure high search rankings
- WPForms to add survey, registration, contact, or any custom form with ease
- MonsterInsights to monitor the website’s performance thanks to its integration with Google Analytics
- Sucuri to prevent malware and hacking
- W3 Total Cache or WP Rocket to ensure the site’s speed with caching and lazy loading
The list above contains only selected examples of plugins, but they cover the basic best practices you must implement to ensure the smooth functioning of your new website. The post-migration stage is about security, performance monitoring, SEO optimization, and overall maximizing of functionality and usability of the site.
Double-check and test
Now it’s time to go through the entire content, and yes, that means each and every page and post, to ensure that everything works and looks the way it’s supposed to and that you haven’t missed any broken links. Schedule a significant amount of time for testing because you have many things to check:
- Page loading
- Image loading
- Menu structure
- E-commerce functionality
- Content structure
- Commenting functionality
- SEO redirects
- Forms
- Restricted access
- Media
- Newsletter sign-ups
- Social media integrations
When everything is double and triple-checked, you can finally launch your new, improved website.
Conclusion
Once you migrate to WordPress, you will probably stay on this versatile platform. We hope this article will help you with the process, but if you need any support in website migration, do not hesitate to contact our team. We’re here to help.


What can we do for you?
Talk to us about your project and let's start building it together!